- September 29, 2021
- Samiulus
- 0 Comments
- 5630 Views
- 0 Likes
- Image Editing
How to create image masking in Photoshop?
Image Masking in Photoshop
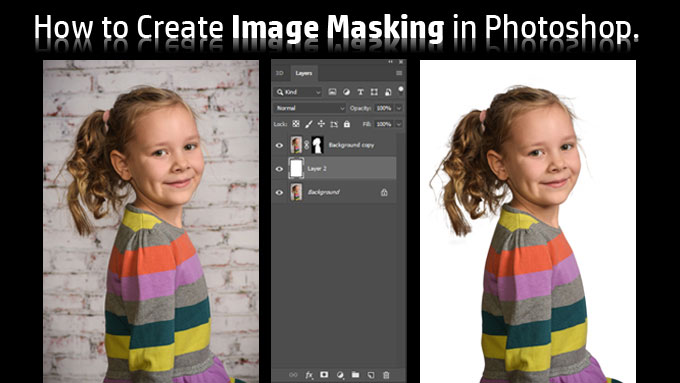
Image masking service in Photoshop is another great image editing technique that is useful for removing image backgrounds. It is a modern Photoshop image editing service for professional photographers and eCommerce business owners. Usually, image masking is used for separating foreground objects from the background. Usually, photo editors apply different clipping path techniques in Photoshop for removing background from an image. Photoshop image masking is used for background removal with the picture of soft edges. You can apply the image mask where hair, furry cloth, dummy, or mannequin remain.
Besides this, if the photographers contain more details like the model’s hair, the fur of the animal, or something like this, simple clipping path techniques don’t work well. In this case, to change its background, photo editor experts use multi-tools from Photoshop and bring out each subtle detail of photographs perfectly from its background.
Another way, at Clipping Path Service Inc, our experts use a pen tablet (Wacom) for changing the background of these types of complex images. It removes the complexities from the whole editing process. Besides, our highly experienced editor can easily blend the hard and soft areas of the image. Our Photoshop experts perform it in no time. They can blend the areas of the photos flawlessly. So you can rely on us for all kinds of Photoshop clipping masking without any hesitation.
Top 5 Different Tools in Photoshop for Masking:
Image masking is a vital skill that you must know for being a photo editing expert in Photoshop. Nowadays, experts use various kinds of advanced tools and techniques for masking. The photo editors are using these tools in different circumstances. Photoshop provides a thousand modes of creating and modifying the photo masking method. But we frequently use some potential tools, and ways that we use for masking images are described below:
-
Photoshop Masking With Background Eraser Tool:
The Photoshop background eraser tool is mainly used for masking. It is a straightforward and top-rated tool known to everyone involved in the post-production image editing task. Masking the subject from a complex background by this tool is an initial task.
-
Image Masking With Selection Tool:
Creating the subtle details using the selection tool would be helpful, but the basic workflow would be identical:
- Create and adjust the selection until the editors are happy with it.
- Editors can turn this into the layers Musk.
- Editors can add the layers using the add layer mask button at the bottom of the layer’s palette.
-
Photoshop Masking With Brush Tool:
The brush tool is another masking tool with different features. Brush tool directly uses White, Black, or Gray color to mask the subject. If the image editors have a graphics tablet, this method can be more influential, which gives editors a lot of control.
-
Image Masking With Channel:
Though the selection tool and brush tool use this, the channels palette is less known for its efficiency. It generates a complex mask. The picture consists of a combination of red, green, and blue channels with RGB mood. Especially each channel of these colors is identified by the Alpha channel (essentially layer mask). That helps to hide or reveals the exact amount of each color. All the combinations are found in the final picture.
-
Image Masking With Clipping Path:
With the sharp edges, objects like cars, statues, and buildings need an exact mask. For creating this type of image, the path is the most effective tool. Photo editors can very efficiently make selections from the path and finally turn the path into a musk. The important amenities of this tool are that other editing tools are not based on the pixels. Also, we can quickly scale without ever receiving pixelated.
Moreover, there is no need to push pixels around, and the expert can change a path anytime. At Clipping Path Services Inc, our expert image editors use these up-to-date tools for image masking. So, you will get the most elegant and eye-catching result as the last time.
How to do Masking in Photoshop:
There are various types of masking in Photoshop. Therefore, you will be able to do a lot of graphic design work by utilizing masking skills. Now, we are going to describe some examples here:
-
Simple Masking:
Here, we will use a simple masking technique to add a new background. For this purpose, firstly, open your image in Photoshop.
- Then, open another picture that will be set in the background. You can copy it by pressing Ctrl+A and Ctrl+C.
- Now at the first image, take a new layer, paste the image that you copied. Again go to the layer panel and drag the second layer under the first layer.
- Again, select the first layer and click on add a mask at the bottom of the layer panel. Now, you will see the new image.
- Then, click on the mask from the toolbar, select the brush tool, and drag it to the background. Now, it will make visible the background by erasing the top background. Again you will see the new image and continue dragging.
- That is the way you can change the background of an image by simple masking. The final image will be the result of our experiment. If you work very patiently, you must get the highest outcome.
-
Layer Masking:
It is another important tool that will enable you to create more high-quality images than before one. We can use this tool for multiple purposes, but we will show you how to remove the image background.
- To use a layer mask, first, open an image in Photoshop and unlock the layer panel by double-clicking in the lock icon.
- Then, select the Pen tool for creating a path around the image. To do that accurately, zoom the photo, and you should choose a path 1 or 2 pixels inside from the edge. Now, we will select an image that has multiple holes for our experiment and create a path.
- Here, we will create a path around the selected image, then inside the multiple holes where the white background is available.
- We will press Ctrl+Enter to make the path selection and click the Delete button to remove the backdrops. For the multiple holes, only we make the path selected and click the delete button, but for selecting the main background, we press Ctrl+Shift+I to inverse and press the Delete button.
- Finally, we get our ultimate image. Usually, it is a background-free picture. Now, we will be able to replace a new background as we wish.
- For this task, we will take a new layer and place it under the main image layer, choose the foreground color, and finally apply it with the paint bucket. In this stage, we have acquired an image that we wanted earlier indeed.
-
Alpha Channel Masking:
It is also another vital image editing tool in Photoshop used for many important image editing services to create more high-quality images. It is mainly used for removing and changing the background with the soft edges image such as hair, fur, thin cloths, and many more.
- To work with alpha channel masking, first, we open a model with a hair image in Photoshop and unlock it. Then we duplicate the layer from the layer palette.
- Go to the channel top right of the Photoshop, choose the most contrast image with the background, and make invisible other channels. Then, duplicate the channel.
- Ensure the duplicated channel is visible when the others are invisible.
- Press Ctrl+I from the keyboard to invert the channel. Now you will see your object image like a blurred shade.
- Then, press Ctrl+L to get level, move the slide to make the background entirely black, removing the white glare.
- Now, take the Pen tool or Lasso tool to create a path around the body & face area. First, make sure white is in both the foreground and the background. Next, press Ctrl+Enter to make a selection and Ctrl+Delete to fill the selected portion with white color.
- Click Ctrl+D to deselect the selection and select Dodge tool, select Highlight from the top left in Photoshop.
- Drag the image on the area that the Pen tool cannot select. Then go to the channel again, select the RGB, Red, Green, and Blue of four channels, and keep un-selected the last one. Now, you will see your targeted image.
- Then, go to the Select icon from the top bar, click on the Load selection, select Blue copy from the drop-down and click on OK to save the image. It will make your image selected.
- Then, come back to the Layer tab again, select the first layer and click on Add a Mask from the Layer Palette.
- Finally, click on the eye icon of the first layer/Layer 0, and you will get a complete background removed from the image. Now, you can give the color of the background as you want.
Final Thoughts
Image masking is an essential part of the Photoshop post-production image editing services for professional photographers and eCommerce sectors. So, you should find the best image masking service provider like Clipping Path Service Inc for your image mask. The image masking services in Photoshop shown above in this article are not as easy as you think. However, if you want to get a quick and easy way to extract a subject from a furry image or replace a more detailed image background, the described methods will help you get your desired results quickly and with the best outcomes.
Tags:
Related Posts
-
What Is Image Masking & How Can You Use It In Image Editing? March 10, 2022


