
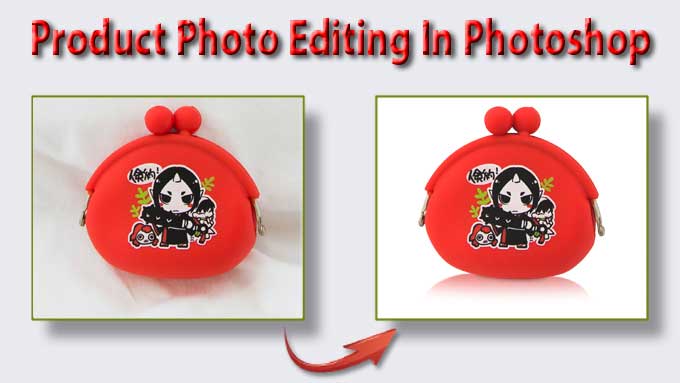
Product Photo Editing In Photoshop
Product Photo Editing In Photoshop: High-quality product photography is essential for flourishing an eCommerce business, as many customers are only influenced to buy a product based on its image. However, if your product photos seem unprofessional or unpleasant, customers may completely turn away from your online store. Fortunately, to create a gorgeous product image, you don’t need to be a professional photographer. Different image editing software like Photoshop enables you to enhance any product image in your online store. If you don’t know how to edit product photos in Photoshop, this article will help you understand some basic and advanced ways to edit product photos. From removing flaws to creating ghost mannequin effects, you’ll learn how to edit dynamic and compelling images. For any product photo editing solution, you can go to a world-famous service provider company like Clipping Path Service Inc.
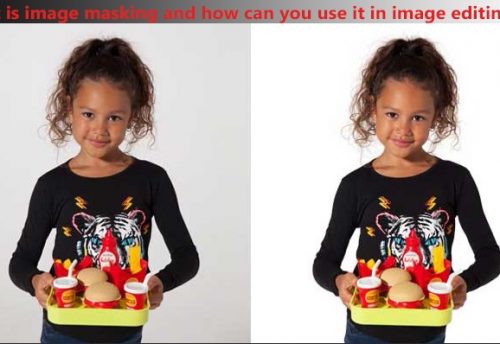
Remove the Background
Background removal of product images is one of the most common product photo-editing actions. In the eCommerce sector, this service has a tremendous impact. The eCommerce image editing experts recommend taking pictures on a white background to eliminate the tedious process of removing or decolorizing objects from the background. Removing background from a product image has many advantages. First, doing this will help the consumers focus on the object in the photo without any hassle.
Second, most online retailers want to showcase their products in the same color on their websites. There are lots of tools designed in Photoshop to remove the background and fulfill the desired requirement. The pen tool is the most popular for the image editing action in Photoshop. In addition, this software has another quick selection tool named “Select and Mask.” However, it isn’t easy to have complete control over the various tools in Photoshop. So the selection may not always be proper. For better experience and quality image editing services, you can rely on our outstanding photo background removal service.
Color Correction
Color correction is one of the essential parts of the post-production image editing service in Photoshop. Before uploading a picture on the websites, you have to fulfill some requirements. First, you have to remember that a product’s color in the picture should be similar to the product’s actual color. You will not disappoint your customers with an item that does not appear in the image provided by your company. Second, you need to adjust the color, white balance, exposure, and contrast to correct the color scheme.
Remove Blemishes
Before taking a shot of the product that you want to advertise, make sure it is clean. Your product images must be free from all kinds of defects, including scratches, dust, fingerprints, etc. Use Clone Stamps and Healing Brush tools to edit your product images in Photoshop and eliminate all imperfectness. Use a Healing Brush if you have to select several parts of the image for your correction. After completing this action, Photoshop will fill the selected area with pixels of the same colors as their surroundings. The Clone Stamp tool is convenient and gives you more manual control, copying pixel values from one place to another. While using this tool, choose low hardness settings to make the colors look more natural.
White Balance
When taking photos of your product, you need to be careful and pay deep attention to the subtle details so that your image does not have any blue color. The alteration of light conditions, camera settings during the photoshoot, etc., can damage a picture’s white balance. If white is not presented consistently in your image, you can adjust the white balance with the help of our Photoshop services. You may need to adjust the color balance of your photo to resemble the color scheme of your product in real life. Use the Curves Tool to achieve this balance.
Color Contrast and Exposure
By modifying the color contrast of an image, you can brighten the faded areas and darken the dark parts. By applying this effect to the image, the picture will be more individual. If you want to get a brighter picture than reality, you have to increase the exposure of an image. When you reverse the process, you will get a darker picture.
Tweaking Colors
Some devices are not able to capture specific colors, such as neon, for example. In this case, you have to tweak the photo’s colors to get the required shade. This technique will allow you to eliminate the effect of the washed-out colors and make your images look realistic and attractive. To see the colors in a photo realized by the human eye in real life, apply Photoshop’s quick and basic color correction feature to achieve this. This feature is used for correcting hue and saturation. First, open an image of your product, then click the Image tab, go to Settings, and select Hue / Saturation. Next, move the triangle slider on both sides to get the expected color.
Batch Process
Visual consistency is essential, but it is a tricky and troublesome task to achieve. However, if you want to do product photo editing in Photoshop, you can use different tools to accomplish this. Using the toolkit provided by this software, you can change the color scheme, warmth, white balance, contrast, etc. of an image. As soon as you reach a balanced set of colors and other aspects, you don’t want to perform these sequences manually for each photo, as this is a very time-consuming task.
Also, when performing this task manually, you are more likely to make mistakes. It is advisable to utilize Photoshop’s actions that save all of the performing steps to be repeated automatically for this work. Using the batch processing services, you can easily edit several images at once.
Change Colors
You have to use the Hue/Saturation tool to edit product photos in Photoshop. Using this feature, you can change a product’s color so that you don’t have to take pictures of the same product but in different colors. For example, if you have twenty or more shirts in different hues and don’t have time to prepare each item for a photoshoot, you can capture several shirts and then change their color using this tool. You have to give attention to the fact that the tool can confirm perfect results when working with colors like red, blue, green and their variations. Do not use the Hue/Saturation feature when you need white, black, or gray colors because this feature cannot change white to pink but is capable of changing blue to pink.
Increase Sharpness
Unsharp Mask is another unique feature of Photoshop that lets you identify the edges of the product you advertise. At a time, it can darken one side of the product and lighten the other side. By changing the contrast across the edges, you can sharpen your images. First click on the Filters, then go to the Sharpen tab and select the Unsharp Mask feature. To find out what settings are best for your products, drag the slider. You can configure such settings as:
Amount: It determines how much contrast level should be increased or decreased.
Radius: After changing this setting value, you will determine the area for adjusting contrast.
Threshold: It prevents Photoshop from sharpening the same colored parts of an image. For example, you have a picture of the sky with clouds featured in different shades of blue. Threshold allows you to sharpen or contrast only a single tone in blue, which prevents your image from showing patches.
Add Shadows
There are mainly two types of shadows in product photos: shadows that darken your product and shadows cast by your product. The first type of shadow is undesirable as it confuses the viewers’ attention and hides the advertised item. The second type of shadow gives the images a real depth that attracts customers. If you need to add shadows to your image, consider two rules. First, you should combine this effect in such a way that it looks realistic and consistent. Second, cast a similar shade of product images. When applying this effect, you can use reflection shadows or drop shadow effects.
Reflection Shadows
These make your product look like it was shot on a reflective surface, like a glass mirror. Social media networks, web pages, and different category pages regularly use these types of shadows. To get this effect, you need to copy the image, paste it as a new layer, turn it on, place it, change the layer mixing mode, and mask it.
Drop Shadows
It creates the effect of direct sunlight falling on your product. First, activate the Layers Style tab at the bottom of the Layers panel, then select Drop Shadow from the drop-down menu bar. Both shadows add depth effect and make your product look grounded, which helps customers see the product three-dimensional and sets it in a particular context.
Remove Reflections
Sometimes you need to take a product shot with mirrors or metallic detail to reflect the light. When working with reflection, you must decide which reflection to get rid of and which one you need to give up. In the process of photo editing in Photoshop, you can remove reflections using any of the easy-to-obtain options. The simplest and fastest method to get rid of an unwanted reflection is to select a color from some neutral background and apply it to the spot you need to fix using the Brush in Color blending mode. Press Alt-Shift-C to activate this process. Sponge Tool is another effective process if the metal surface is only neutral.
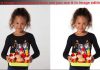
Ghost Mannequin Effect Creation
If you design clothing and want to take pictures of them to showcase your products to online customers, you need to make these pictures appealing and clean. However, you have to spend a lot of money to hire a model or purchase a mannequin. Moreover, they can confuse the customers with the essential thing in the picture: the advertised clothing. The ghost mannequin effect lets you take an image with a product on a model or mannequin and then eliminate the model or mannequin at the post-production service. This effect allows your customers to see one piece at a time from every aspect for considering every detail in a 3D format.
By this method, you may show parts of your apparel that could not be seen when worn by a model or mannequin. As a result, you will get a fantastic photo focusing on your creation, which will aid you in increasing the number of sales. This method is inevitable for product photo editing in Photoshop because it helps customers imagine themselves in a piece of clothing without too much effort.
Crop and Straighten
To achieve uniformity and consistency in all the images you create, you must ensure that all photos are the same size and dimensions. You can do this aspect while taking pictures using the grid function of your camera or mobile phone. However, you can enhance an image with the help of Smart Guides. Photoshop offers this service. By using the guidelines, you can quickly generate a template and make your images uniform and consistent.
Final Thoughts
Product Photo Editing In Photoshop is not as easy a task as you think. On the contrary, it may be pretty tricky, requiring a lot of skill and deep attention. The most complex task is to achieve the accurate presentation of your product so that your customers are not confused. When you want to sell your product on Amazon, you should consider that this platform has image size guidelines and specific technical requirements. You must fulfill these criteria; otherwise, you will not be able to publish your photos there.
For example, the width and height of the image should be a minimum of 1,000 pixels. In addition, the image must have a white background and take 95% of the product’s image. Every online marketplace like Amazon, Shopify, eBay needs product photography. But, even if you don’t sell your merchandise to another online market, your images should have similar quality in your online store. With photo editing software like Photoshop, you can properly promote your products and thrive in a successful eCommerce business.

Leave a Comment
You must be logged in to post a comment.